









Function canceled
Function canceled


 Lyngsat
Kingofsat
Dishpointer
DVBSkystar.com
satbeams.com
CS Sat fórrum
Parabola
DVB-Upload
DVB N Forum
dvhk.pl
sat-television
Sat Centrum
SkyStar.org
TV Freak
Technisat
techneteuweb
Jak psat web
Jak na web
Zive.cz
Interval
O webu
Webguru
Builder.cz
Linuxsoft.cz
Tutorials.cz
web.net-mag.cz
Kosek.cz
webtvorba.cz
CSS Creator
samples.cz
programujte.com
builder.cz
časopis.programátor
učebnica c++
Odkiaľ je IP
Uč sa Anglicky
Speedtest
Otestujte sa
Lyngsat
Kingofsat
Dishpointer
DVBSkystar.com
satbeams.com
CS Sat fórrum
Parabola
DVB-Upload
DVB N Forum
dvhk.pl
sat-television
Sat Centrum
SkyStar.org
TV Freak
Technisat
techneteuweb
Jak psat web
Jak na web
Zive.cz
Interval
O webu
Webguru
Builder.cz
Linuxsoft.cz
Tutorials.cz
web.net-mag.cz
Kosek.cz
webtvorba.cz
CSS Creator
samples.cz
programujte.com
builder.cz
časopis.programátor
učebnica c++
Odkiaľ je IP
Uč sa Anglicky
Speedtest
Otestujte sa

WinCSC

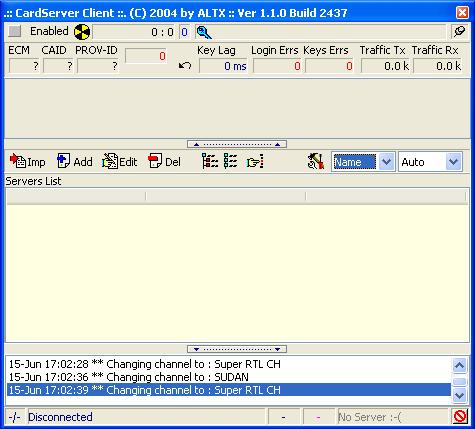
WinCSC (CardServer Client) is another great little program from ALTX and is used for sharing a card or emu over a network (internet). To explain it simply, it works like this: friends chip in for a pay TV card, but only one person can physically use it. So the one who has the card installs CardServer, and the other friends install WinCSC (the client), which must be configured — and then everyone can watch. Configuration is not complicated; you just fill in a few fields and you’re done. So let’s begin: Extract WinCSC into the folder where you keep all your plugins, start your DVB Player, and click on plugins — WinCSC → monitor should be there (image 1). In the middle you will see four buttons: Imp, Add, Edit and Del.

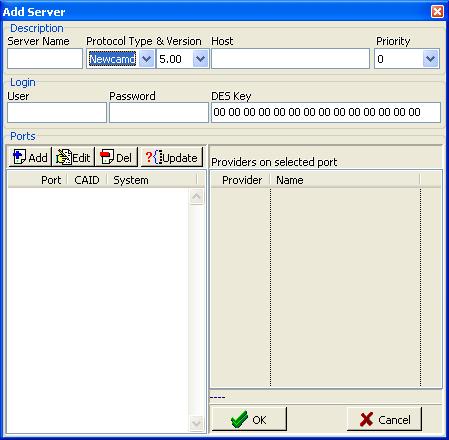
Imp is used when you already have a configuration file — the file named WinCSC.cfg. If you don’t have it, you must configure everything yourself. To do that, use the Add button — a window opens (image 2). There you fill in the server name (Server Name), protocol type and version (Protocol Type & Version). You can choose from three protocols: NewCamd, Radegast and Camd35. Next is Host — enter the IP address of the server. Then User and Password — that’s clear (username and password). And Des Key — usually it is 01 02 03 … 13 14. That’s basically everything.

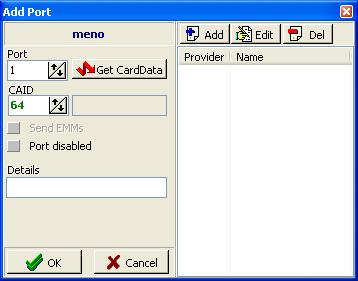
Next we will configure Ports. Again, in the open window you see four buttons: Add, Edit, Del and Update. Click Add and another window opens (image 3). There you fill in the port and CAID of the system (not required) and click GetCard Data. If the server is running, you should receive the CAID. If an error appears, something is not filled in correctly or the server is disconnected. Click OK — and that’s basically everything. And I forgot one important thing — in the first image, at the top left, there is “enabled” — this must be checked. If everything is configured and the picture still does not appear, then in the channel settings you must select the correct ECM (now it should work).