










Function canceled
Function canceled


 Lyngsat
Kingofsat
Dishpointer
DVBSkystar.com
satbeams.com
CS Sat fórrum
Parabola
DVB-Upload
DVB N Forum
dvhk.pl
sat-television
Sat Centrum
SkyStar.org
TV Freak
Technisat
techneteuweb
Jak psat web
Jak na web
Zive.cz
Interval
O webu
Webguru
Builder.cz
Linuxsoft.cz
Tutorials.cz
web.net-mag.cz
Kosek.cz
webtvorba.cz
CSS Creator
samples.cz
programujte.com
builder.cz
časopis.programátor
učebnica c++
Odkiaľ je IP
Uč sa Anglicky
Speedtest
Otestujte sa
Lyngsat
Kingofsat
Dishpointer
DVBSkystar.com
satbeams.com
CS Sat fórrum
Parabola
DVB-Upload
DVB N Forum
dvhk.pl
sat-television
Sat Centrum
SkyStar.org
TV Freak
Technisat
techneteuweb
Jak psat web
Jak na web
Zive.cz
Interval
O webu
Webguru
Builder.cz
Linuxsoft.cz
Tutorials.cz
web.net-mag.cz
Kosek.cz
webtvorba.cz
CSS Creator
samples.cz
programujte.com
builder.cz
časopis.programátor
učebnica c++
Odkiaľ je IP
Uč sa Anglicky
Speedtest
Otestujte sa

vPlug_server
1. Introduction
Recently, news appeared on the internet that the older conditional access system Cryptoworks CAID 0D02 was cracked and is available in emu (software that emulates devices required for decoding encrypted channels). At the time of writing this article, it is possible to watch UPC freesat, SkyLink, TNT Sat, ORF, Austriasat and Globo without an access card on certain satellite boxes. Even though PCI-E DVB-S2 satellite cards are no longer very popular, it is clear that updates of various plugins, players, etc. are still being developed. The result is vPlug or vPlug server.
2. Background
Let’s imagine a satellite box with a CI (common interface), inside it a CAM (conditional access module), and inside the CAM an access card. The satellite TV provider sends encrypted data in the ECM (Entitlement Control Message) stream. When a coded channel is tuned in the satellite box, the box sends a request to the card, which generates a DCW from the received ECM — the DCW is needed for decoding (picture, sound ...). DCW (Direct Control Word) is a key composed of two sixteen‑digit hexadecimal numbers (so‑called even and odd), which change cyclically approximately every 10 seconds. This process, which I described in two sentences, is of course much more complex, using complicated algorithms, but that is not the purpose of this guide.
3. What is vPlug Server
vPlug server is an application running under Windows OS, which uses Vahid’s modules (Vahid is the alleged author and creator of the vPlug plugin). vPlug server is therefore a software replacement for CI, CAM and the access card, and in addition it can send the generated DCW to other clients, meaning it behaves as a server in the network that serves clients.
4. Usage
First, I would like to clarify the situation regarding vPlug. At the time when PC DVB-S cards were popular, the vPlug plugin (emu) began to be developed, which could emulate various encryption systems. vPlug is therefore a plugin (a library, not a Windows application) that works within DVB players. Attention!!! vPlug server is not vPlug. vPlug server uses modules and various files that generate data needed for decoding and sends them further, whether to localhost or over the network. So in short, vPlug server generates keys and can send them to clients (while vPlug generated keys and used them within the player interface). Another function of vPlug server is the ability to connect to other CCcam servers and share other cards.
5. Download and application structure
The application can be downloaded here: vplug_server_v1.0.2.21.rar
I tested vPlug server on Windows XP SP2 and Windows 7 Ultimate 32‑bit. It worked reliably on both.
After downloading, extract the rar archive somewhere on the disk, e.g. c:\vPlug Server. Its contents are 5 directories and 8 files.
The directories contain the necessary modules for decoding and files for the web interface. In the root directory there are the mentioned 8 files:
- ..\vPlug Server\vPlug_Server.exe (main program)
- ..\vPlug Server\vPlug_Server.xml (configuration file)
- ..\vPlug Server\wwwroot\Index.HTML (index file for the web server)
- ..\vPlug Server\sqlite3.dll (database module)
- ..\vPlug Server\vModules\*.mdl (Vahid’s modules)
- ..\vPlug Server\v_keys.db (key database)
- ..\vPlug Server\v_sids.db (file with stored SIDs)
- ..\vPlug Server\vModules\ProvidersDef.db (providers)
6. Configuration
The server configuration can be done in two ways: manually by editing the vPlug_Server.xml file, or through the GUI (Graphic User Interface) in the application itself. Changes made through the GUI are automatically written and saved into the vPlug_Server.xml file.
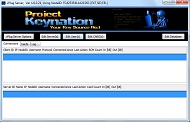
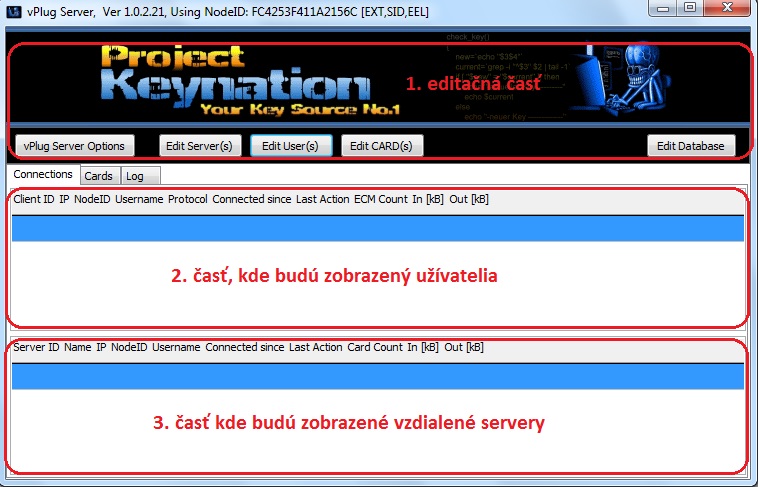
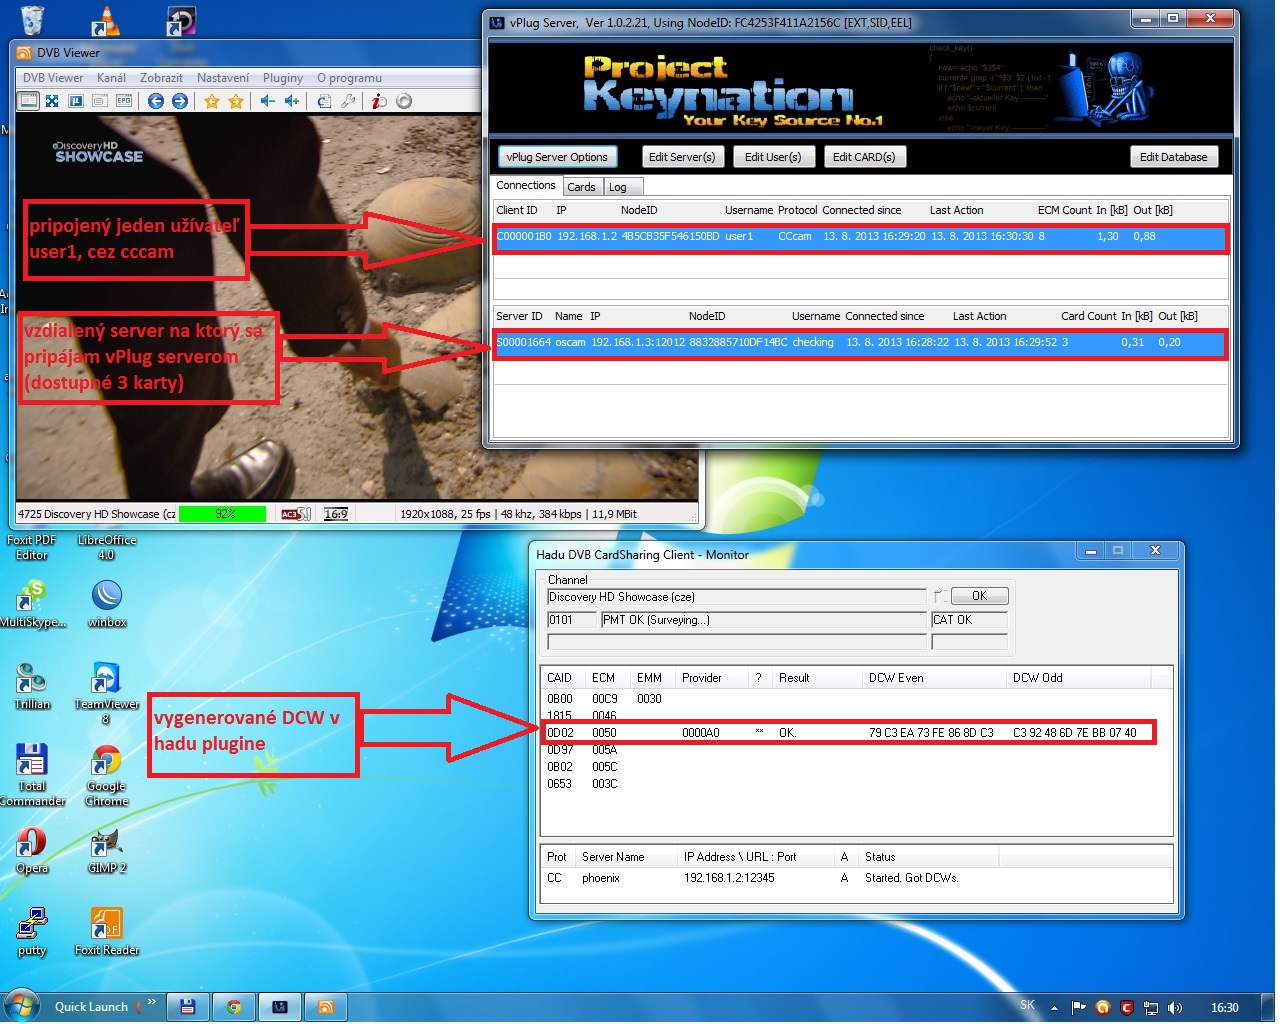
After launching vPlug_Server.exe, the vPlug server window appears (see image on the left). The window is divided into three parts: the upper editing section, the middle section where connected clients will be displayed, and the bottom section where remote CCcam servers will be shown. In the image these sections are outlined with a red border. In the upper section you can see 5 editing buttons:
- vPlug Server Option
- Edit Server(s)
- Edit User(s)
- Edit Card(s)
- Edit Database
6.1 Server configuration
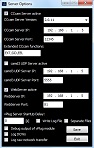
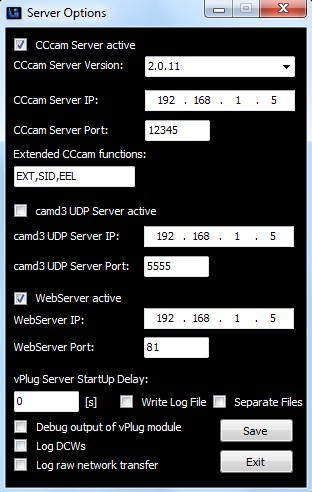
Let’s first configure the server — click on vPlug Server Option (see the image on the right). Check the box Cccam Server active,
which activates the CCcam server. Choose a version (e.g. 2.0.11). The next step is entering the IP address. Let’s assume that
the PC running vPlug server has the IP address 192.168.1.5 — this is the IP address we will use. The CCcam server port is the port
on which our CCcam server will listen. By default CCcam is set to 12000, but it is possible to use another port, e.g. 12345.
I recommend a higher number, because lower ports may already be used by the system, to avoid complications. The CCcam server is now
configured and ready for use.
Another option in vPlug server is using a camd3 server. Only 2 parameters are configured there: IP address and port. The IP address
is the same as for CCcam, and the port should be different from the CCcam port. I have not used the camd3 protocol yet, but I assume
it should work without problems. If the activation box for camd3 is not checked, it will not be active.
We can also use the web server for monitoring. The IP address is again the same, and the port can remain 81. If we want to monitor
vPlug server through the web, simply enter http://192.168.1.5:81 into your preferred web browser. Through the web interface it is
possible to activate or deactivate servers (CCcam, camd3), see connected clients, logs...
Other items are used for delayed start, enabling logging, and selecting what we want to log. Now click the save button and the
configuration will be saved into the vPlug_Server.xml file. The server is now configured and we can close the window.
6.2 Adding a remote server
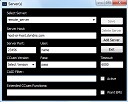
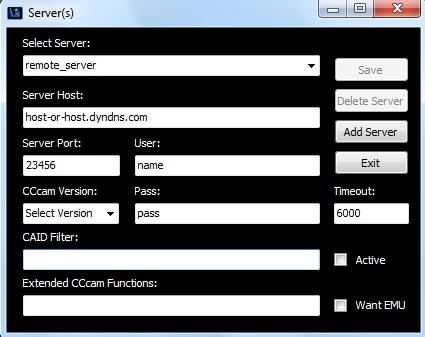
A very interesting feature is sharing cards from external servers. This can be configured by clicking the Edit Server(s) button. Before using this option, we must know the parameters of the given server. These parameters can only be provided by the owner of the remote server. If we have these parameters available, click the add server button and enter the server name (this is not a parameter — it is only for our reference). The next values: Server Host, Server Port, User and Pass are mandatory (these are parameters from the owner of the remote server). Next, choose the CCcam version (vPlug server is fully compatible with CCcam 2.2.1 servers). CAID Filter: an option to select specific cards from the remote server. The remote server may provide multiple cards, but if we are interested for example in sky*ink and u*c (ICE cards), then we use CAIDs 0D96, 0D97. If this field is left empty, we will receive all available cards from the server. Checking Want EMU will also enable emu support from the remote server. If the remote server is configured, click save and you may add another server or close the window.
6.3 Adding a user
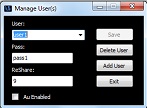
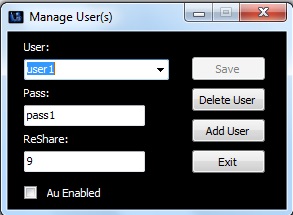
Now we will configure clients who will connect to the vPlug server. Click the Edit User(s) button and then Add User. Fill in the user name and password. There is also a ReShare option, which determines how deep the user may reshare from our vPlug server. Today this no longer has much meaning, because if a user connects to our vPlug server using oscam or CCcam, they can freely reshare further. The only way to prevent reshare is to “disconnect the client”. Through Edit User(s) it is possible to add (probably) an unlimited number of users. Users are saved into the vPlug_Server.xml configuration file after clicking save. There is also an item Au enabled. This does not have much meaning for us, since we do not have a real card and EMM cannot be written anywhere.
6.4 Adding cards
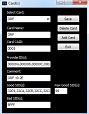
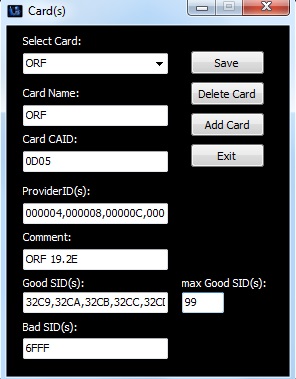
If we want to add a virtual card (for which a module exists) to vPlug server, click Edit Card(s) and then Add Card. Enter a name (according to the image), e.g. ORF, and then fill in the CAID (Conditional Access Identification). We must know that the CAID for ORF is 0D05. It is also possible to fill in ProviderID(s), the so‑called IDENT. Comment is only an informational field for us (if we leave it empty, everything will work normally). Similarly, Good SID(s) and Bad SID(s) — SID (Service Identification) is the identifier of each channel. Click save and you may add another card or close the window.
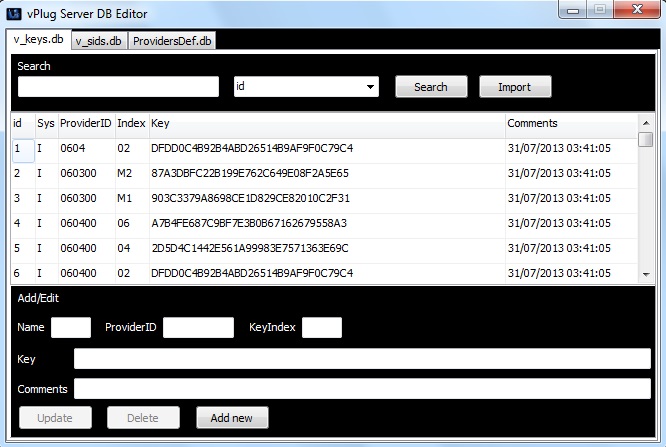
6.5 Editing the database
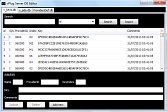
Edit Database is used to edit keys, SIDs and Providers.
These values (mainly SIDs and Providers) do not change often, but sometimes a key may change. In case of a key change,
it is necessary to wait for a new one, or in the worst case, if the provider performs changes in the system that are not
known to the community, we may not receive the key at all and the result will be darkness. Editing keys is very simple
and intuitive. A provider can be found for example by CAID (ProviderID), and the key is copied using CTRL+C and CTRL+V
and then clicking update.
This was a brief overview of how to configure vPlug server. Next, we will briefly show how users can connect
to our vPlug server.
7. Connecting users
Users (or satellite boxes) that support the CCcam or camd3 protocol can connect to vPlug server. Today there are many boxes
on the market that support CCcam — for example DreamBox, IP Box, and also cheaper Fergusons, AB Cryptoboxes, etc.
It is also possible to connect from DVB‑PC using plugins such as hadu or acamd.
Finally, let’s show how a C: line in cccam.cfg will look for a DreamBox using the CCcam server.
According to the images used in this guide, it will look like this:
C: 192.168.1.5 12345 user1 pass1
8. Demonstration
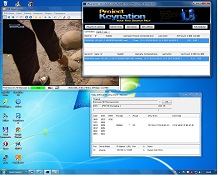
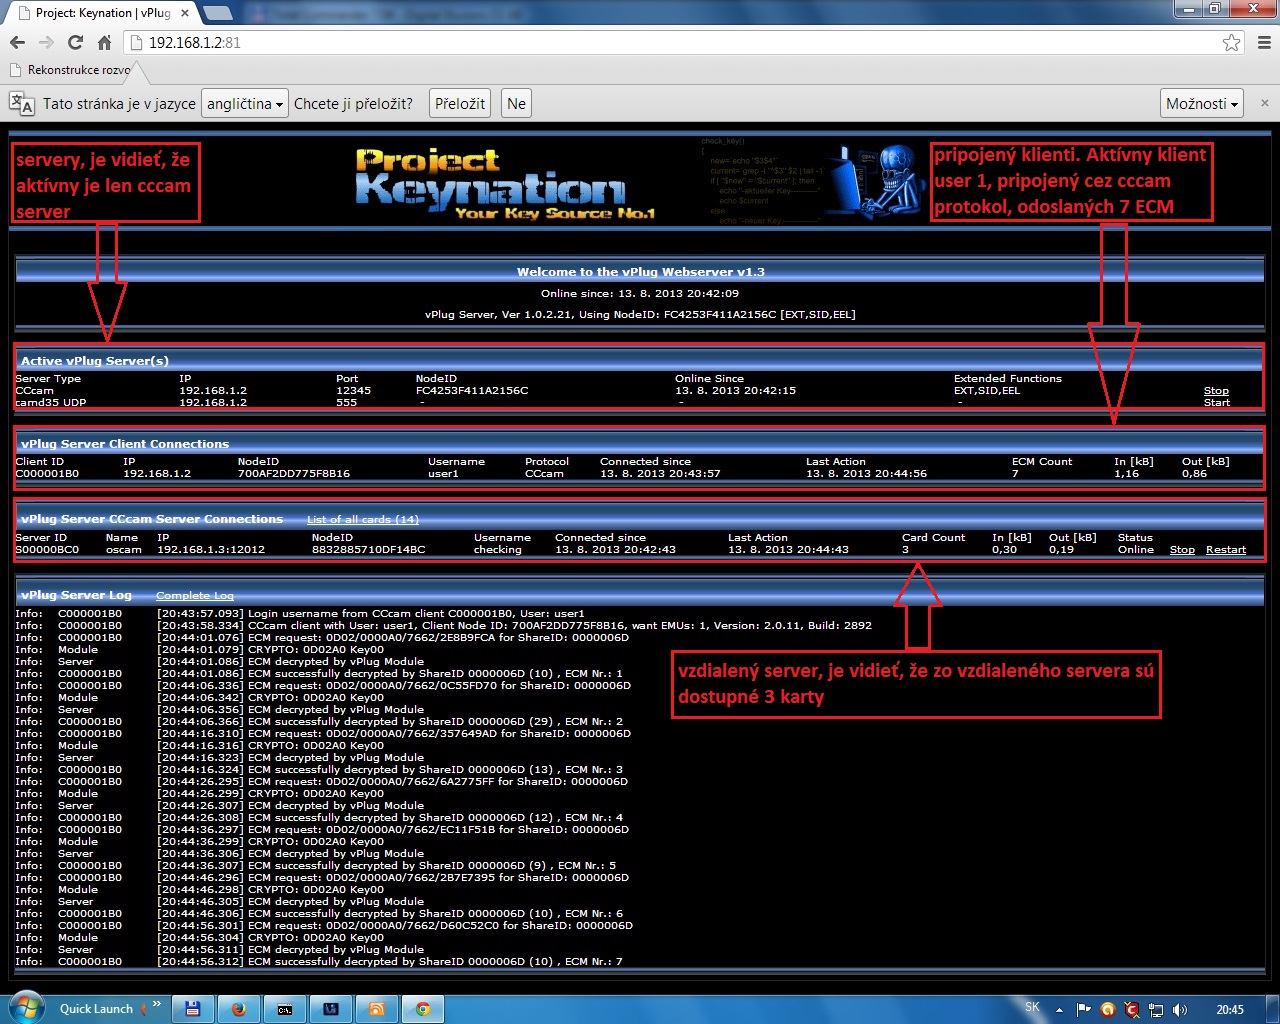
At the end of this guide, I added two demonstration examples. After clicking the links under the images, the image will enlarge
and is also described.
9. Conclusion
This guide is really very brief and describes only the basic configuration of vPlug server. Other providers are also configured
in the download package. At the time of writing this article, I successfully tested the following providers: UPC, SkyLink, ORF,
AustriSAT, TNT SAT and TV Globo.
So that should be everything. If you have any questions, you can contact me or write in the guestbook.